The teaching, research, and administrative areas of the university campus have been fully covered with 5GHz Wi-Fi. Users are recommended to use the iFudanNG.1x wireless network for a stable and high-speed connection.For Fudan University students, the username for the wireless network is your student ID number, and the password is your Unified Identity Service (UIS) account password (please refer to the Unified Identity Authentication Platform – UIS section in this manual for details). During the first connection, you will be prompted to enter your username and password. After that, the system will automatically log you in. If you change your password, you need to delete the existing wireless network configuration and reconnect. Guest users from outside the university should use eduroam.
Introduction to iFudanNG.1x
The iFudanNG.1x network supports all types of devices and operating systems. Once configured successfully, the system will automatically connect as long as you are within the signal coverage area. It only supports the 5GHz frequency band , which experiences minimal external interference, resulting in more stable wireless connections. For optimal performance, please set other wireless networks to Forget when using iFudanNG.1x.
 Windows 10/11
 iOS
iOS Android
 Linux
Linux
ØConfiguration Method: Click to connect to iFudanNG.1x , then enter your username/identity and password.
Configuration Methods for Wireless Devices
Taking iFudanNG.1x as an example, the following instructions outline the configuration methods for various wireless terminals. For other operating systems, generally select the security type as 802.1x or WPA2-Enterprise, and set the inner authentication method to MSCHAPv2.
1. Connecting on Android Devices:
1) Open WLAN settings and wait for the iFudanNG.1x signal to appear.
2) Tap on iFudanNG.1x to configure it.
3) Enter your wireless network “username” and “password” in the corresponding fields. Leave other settings unchanged.
4) After entering the information, tap “Save” or “Connect” to automatically start the authentication process.
5) Wait until the status shows Connected, then you can begin using the wireless network.
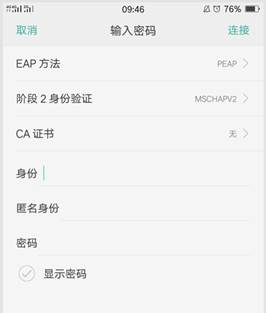
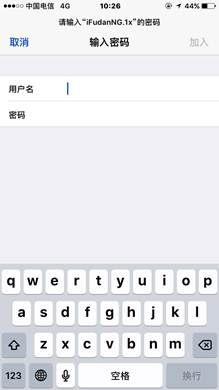
2. Connecting on iOS Devices (iPhone/iPad, etc.):
1) Open Wi-Fi settings, enable Wi-Fi, and wait for the iFudanNG.1x signal to appear.
2) Tap on “iFudanNG.1x”, then enter your username and password , and tap “Join”.
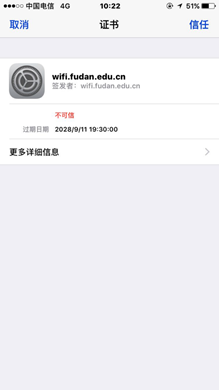
3) On the first connection, a server certificate verification prompt may appear. Click Trust to proceed.
4) On the first connection, a server certificate verification prompt may appear. Click Trust to proceed.
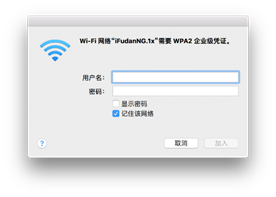
3. Connecting on macOS Devices (MacBook, etc.):
1) Open “AirPort”, and wait for the iFudanNG.1x signal to appear.
2) Click on iFudanNG.1x, and in the pop-up window, enter your wireless network username and password. Set 802.1x to Automatic, and check the box “Remember this network”, then click “Join” to save the settings and connect automatically.
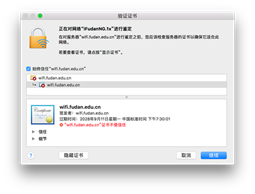
3) During the connection process, you may be prompted to verify a certificate. As shown in the figure, choose “Always Trust”, then click “Continue”.
4) After selecting “Always Trust”, the system will ask for your computer's login password to update the settings. Wait until the status shows Connected, then you can begin using the wireless network.
4. Connecting on Windows 10:
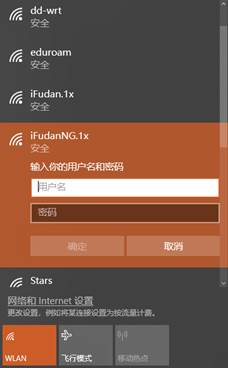
1) Click the network icon in the lower-right corner to open the network selection list, wait for the iFudanNG.1x signal to appear, select it and click Connect, then enter your wireless network account information and click OK;
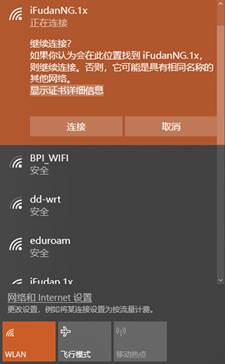
2) If a certificate verification window appears, click “Connect”.
3) Wait until the status shows iFudanNG.1x connected , then you can begin using the wireless network.
5. Connecting on Windows 11:
1、Click the network icon in the lower-right corner of the screen to open the network selection list. Wait for the iFudanNG.1x signal to appear. Select iFudanNG.1x and click “Connect”. Then enter your wireless network username and password, and click “OK”.
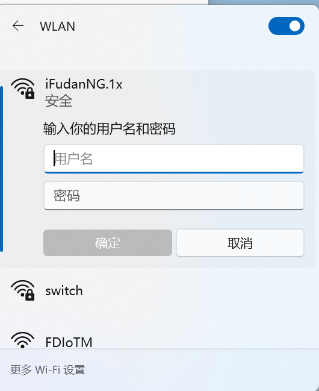

2、If a certificate verification window appears, click “Connect”.
3、Wait until the status shows iFudanNG.1x connected , then you can begin using the wireless network.
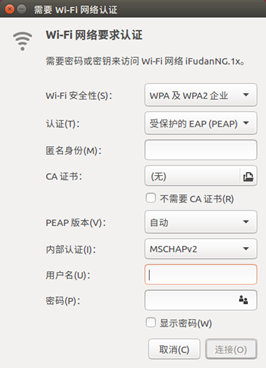
6. Connecting on Linux System:
1、Turn on the wireless network and wait for the iFudanNG.1x signal to appear.
2、Click on “iFudanNG.1x”, and a configuration window will pop up. Set the security type to “WPA2-Enterprise”, the authentication method to “PEAP”, the PEAP version to “Automatic”, and the inner authentication method to “MSCHAPv2”. Enter your wireless network username and password in the appropriate fields. Click “Connect” to save the settings and establish the connection automatically.